HOW TO CREATE A READING CORNER
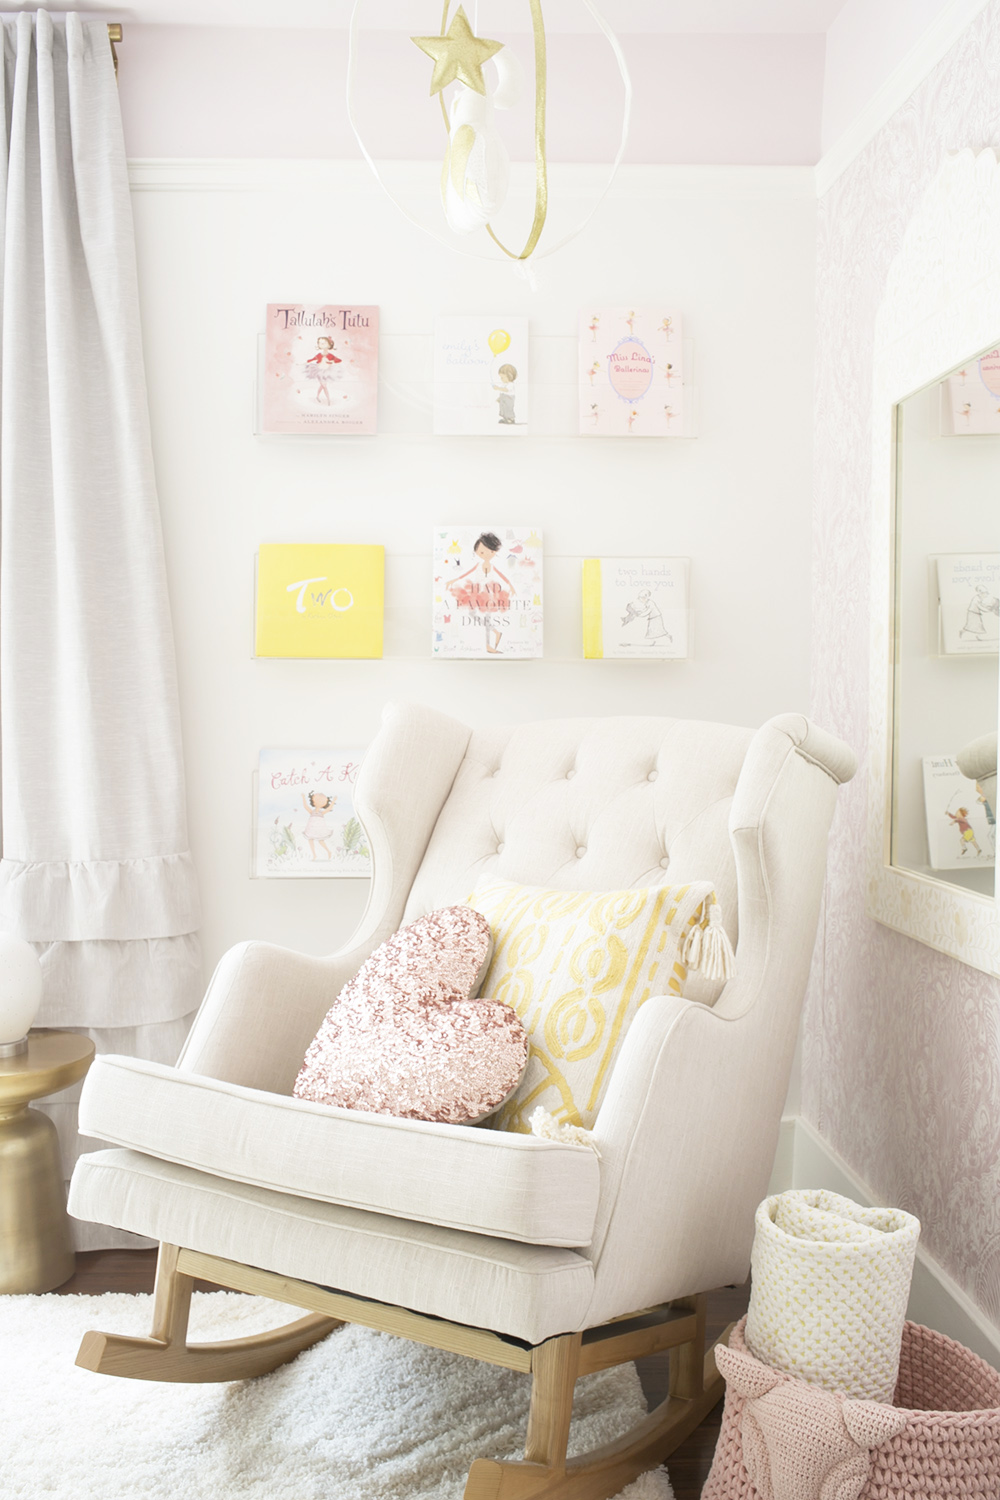
photo from Nayviah's room
Two words: reading corner! As a Mom and in creating designs for clients, I love when I get asked for a reading corner. There is something so magical about what happens over the years here; snuggles, night time feeds, those eye gazing stares with your little one (my favourite!) and lots of stories.

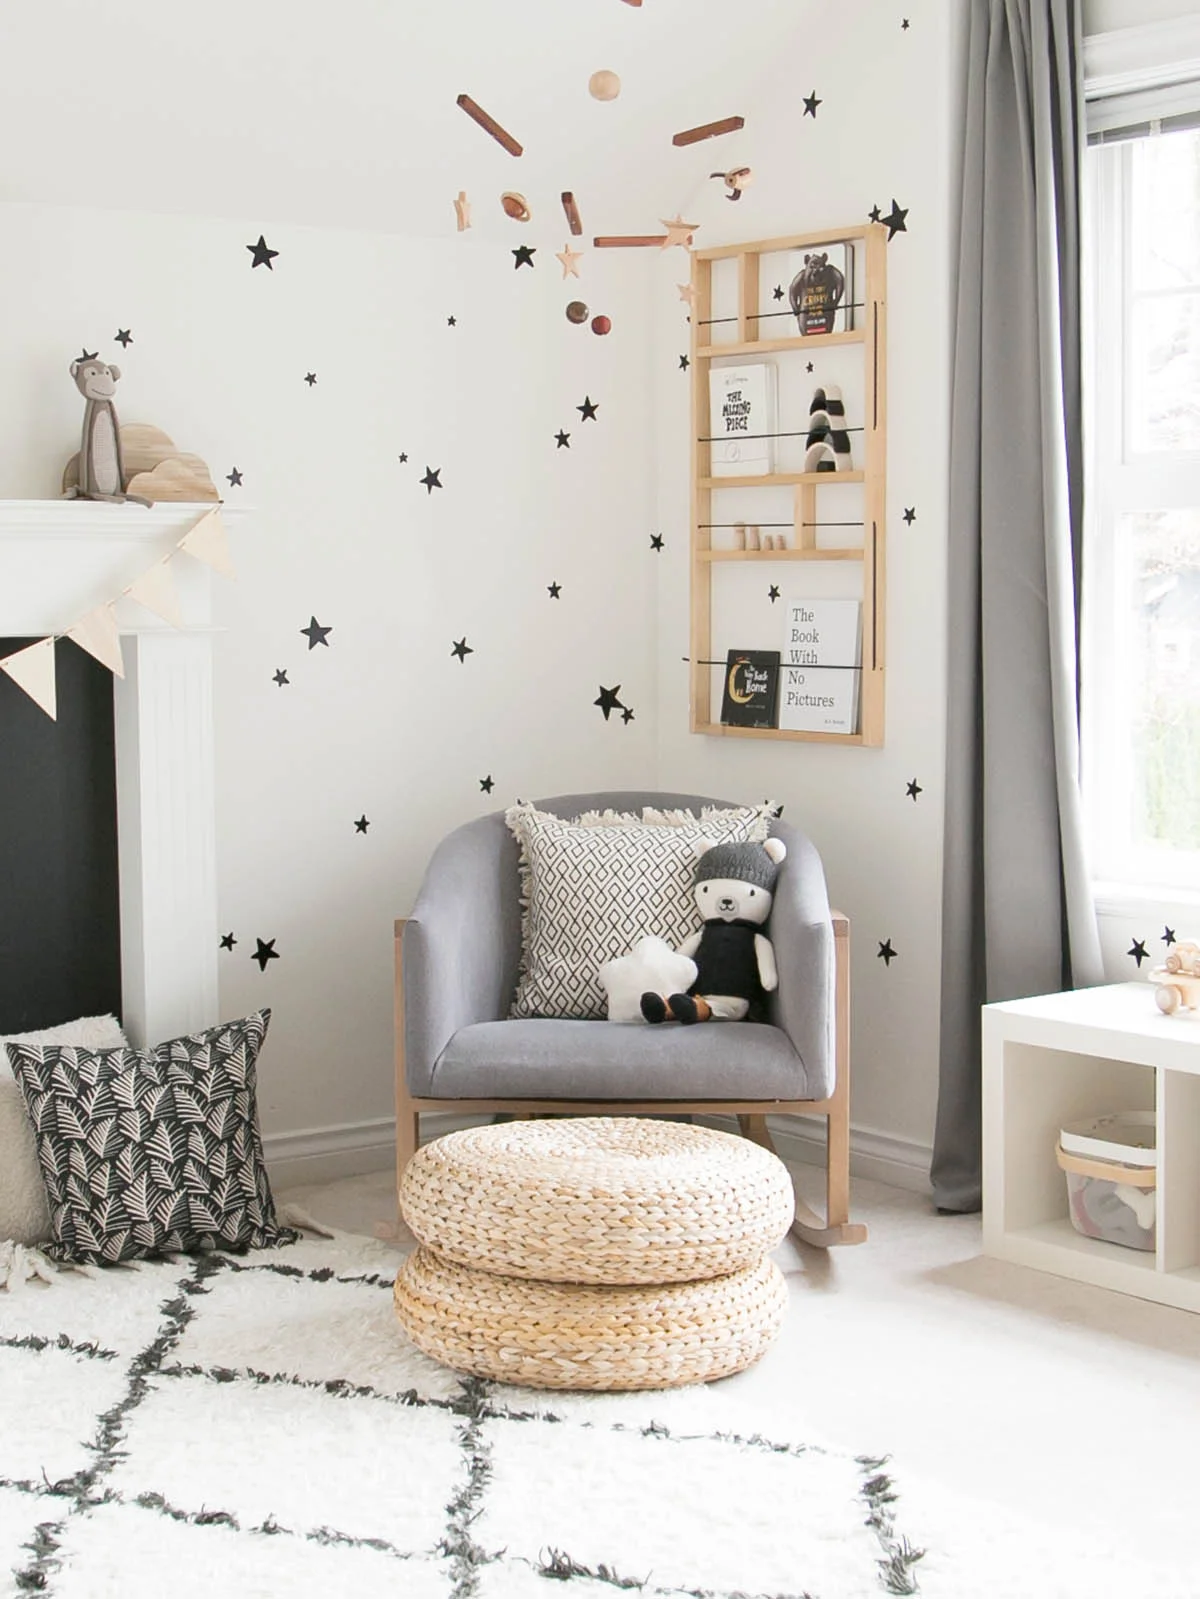
photo from Xavier's room
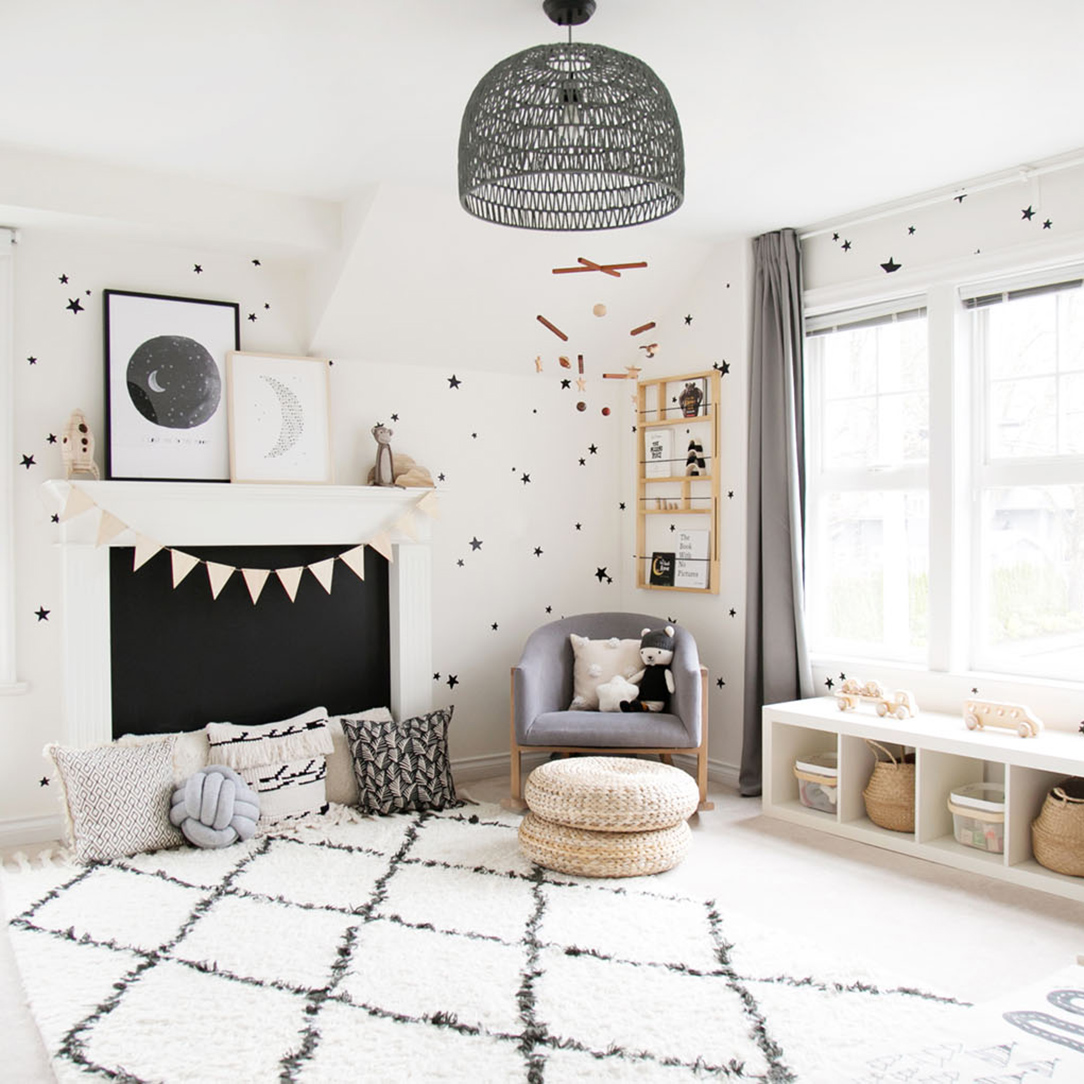
photos from Miles' room
There are really only only a few things you need to create a corner like the ones you see here.
1. A good chair is an essential in a baby room; this chair should be comfortable for whoever will be up during the night with baby and I always recommend either a pouf for a footrest or a chair with a built in footrest. Putting your tired feet up should be make as easy as possible.
2. A pillow! This might not seem like a necessity but a small pillow seems to aways come in handy for relieving a sore back or even resting baby's head.
3. A blanket is handy to have to cover cold toes or even to wipe up spilled milk in emergencies!
3. Somewhere to rest a drink / lip balm / cloth. This can either be a side table if you have the space or, as in Miles' room above, the window toy storage acts as a surface for a drink due to the low height of the chair, which in this case was the perfect fit for Mom.
4. A book shelf doesn't have to be big, in fact, even a floor basket would work if the walls above don't. The idea is that books are accessible and will therefore get pulled out and read regularly.
5. A dim light (optional). While some people think a night light or lamp next to the chair is an essential, I have found that many clients prefer to have a dimmer switch for the overhead light that they can turn off when they leave the room. Either way, some form of lighting is a great addition.
6. Last, but not least, books! Reading to your little one can start even before birth; we have read at all different times of the day throughout the years but it has always been a daily special pre-bed activity that we all look forward to.
HOW TO DIY GIANT PEGBOARD!
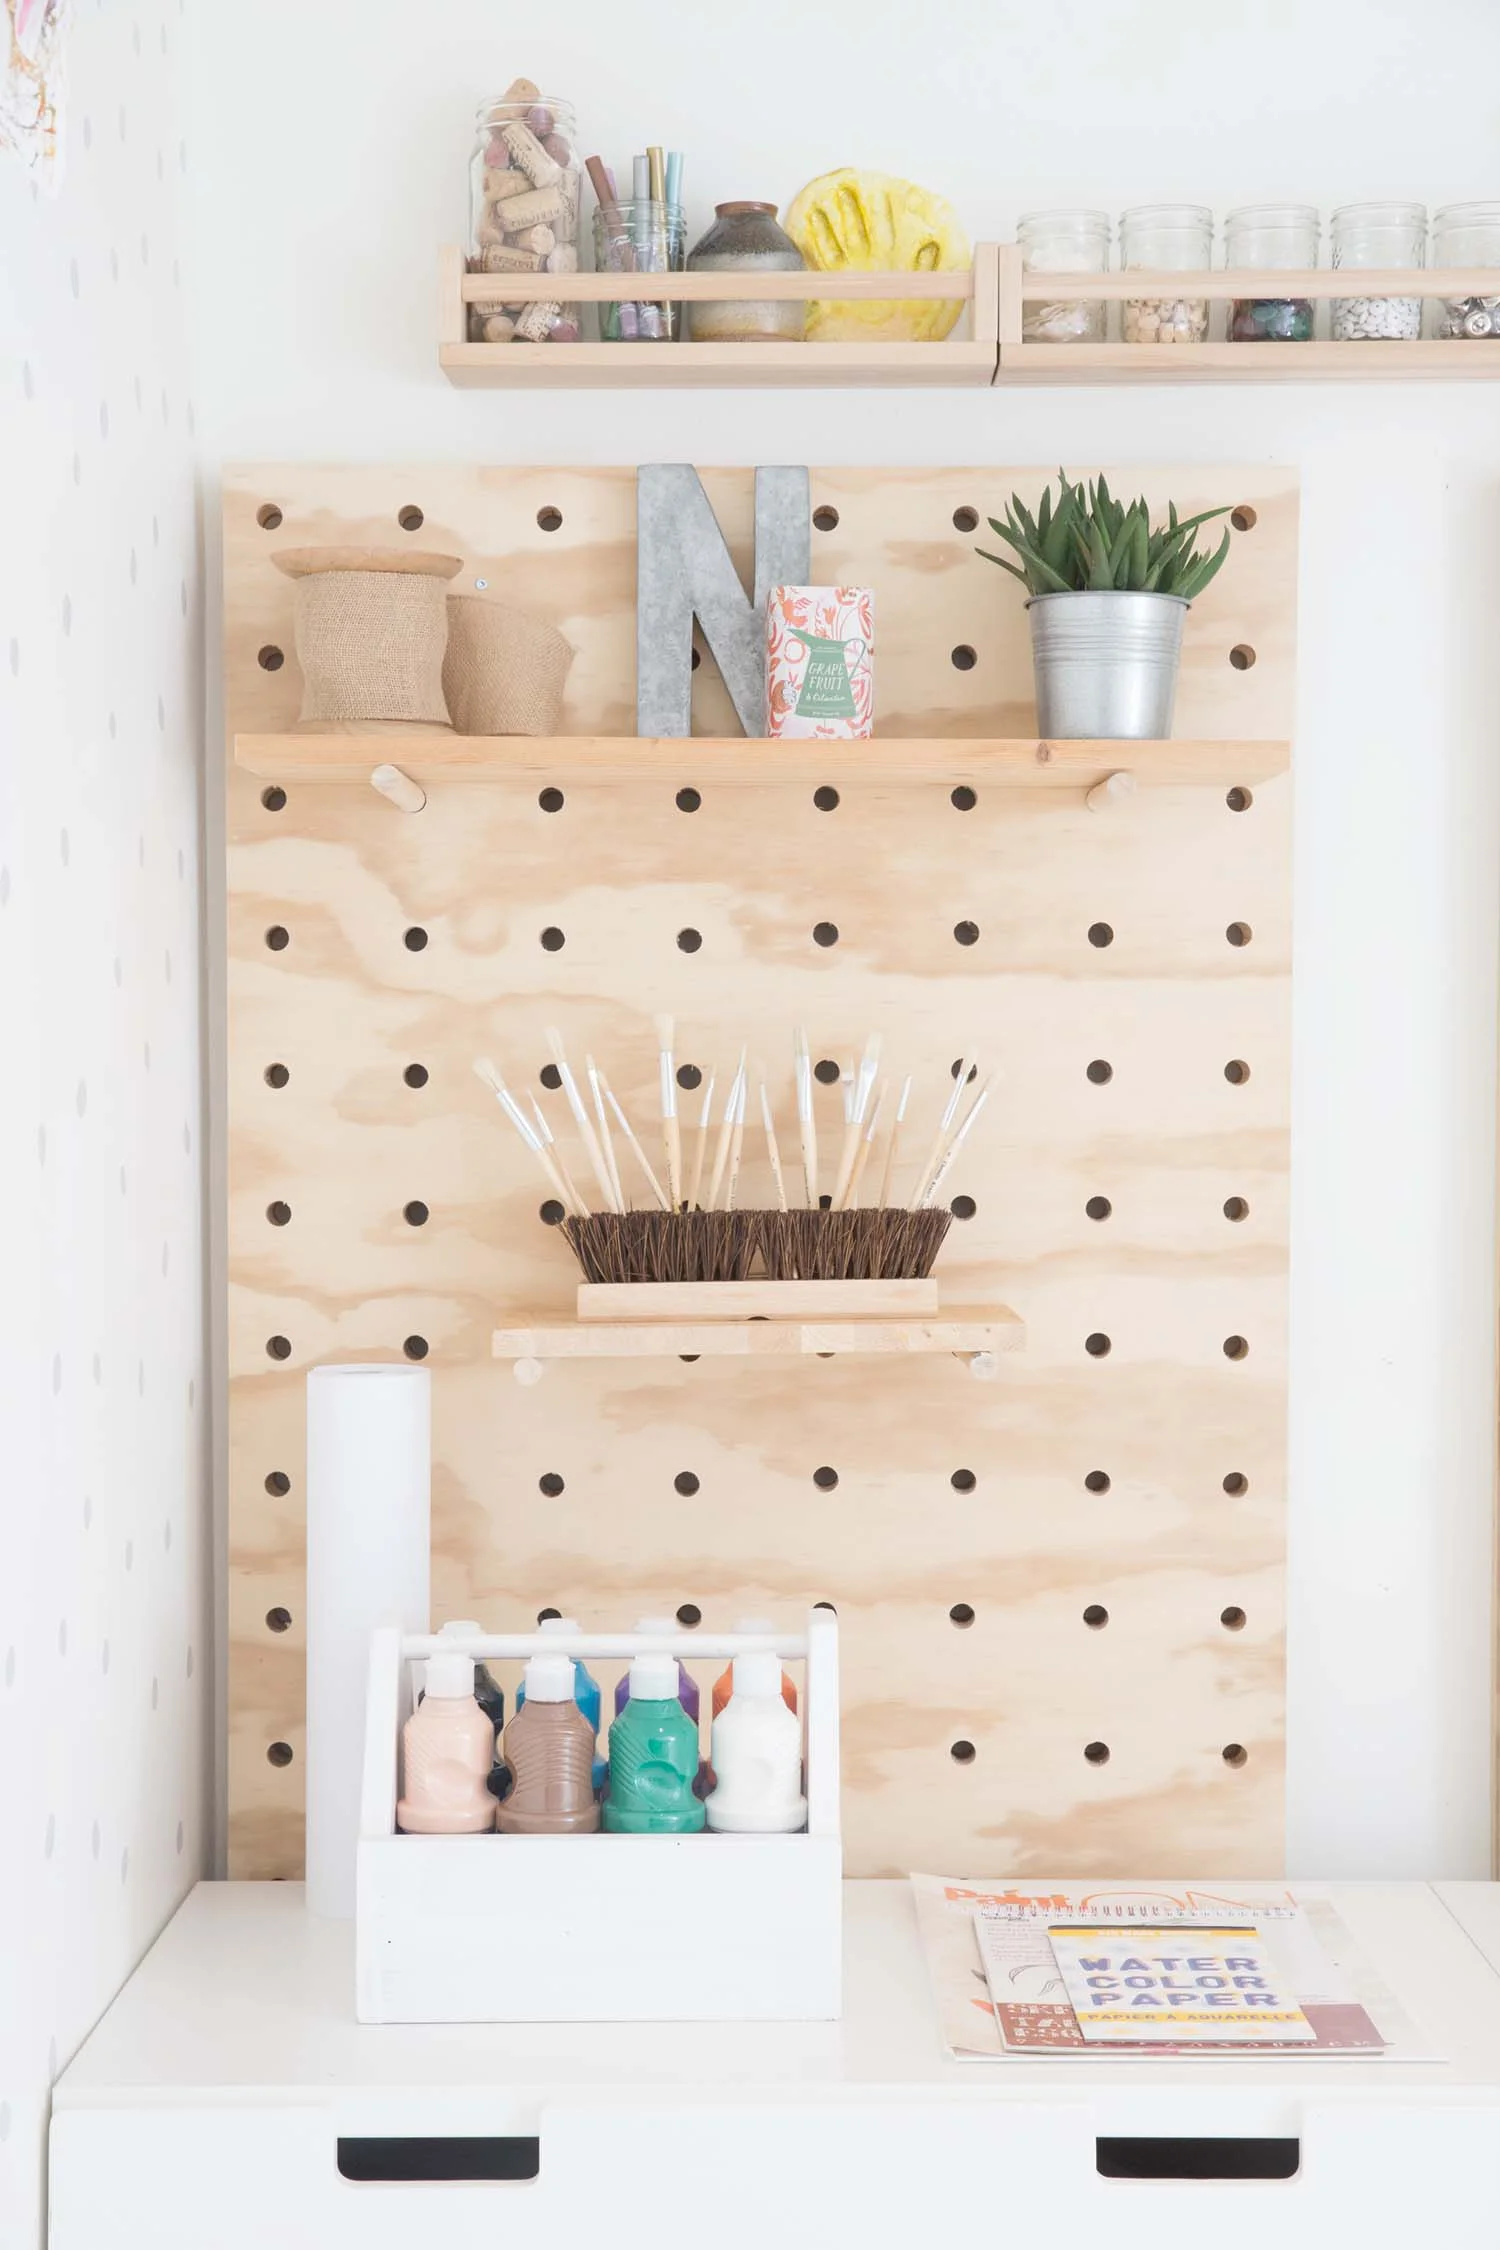
Since posting our kids creative art space, I've been asked countless times where we found the giant pegboard!
We didn't buy these pegboards but had them made especially for the space. Instead of replying to each one of you, I thought writing a short post explaining our process could help all of you if you are interested in creating this look for your own home.
I started by using this amazing tutorial and modified it by adding a second board behind the first so that we could have shelves that hold much more weight, as you can see in the photo below.
Once the wood was purchased and cut (thanks Home Depot!), the next step was marking out where the holes would go and we did this with a black Sharpie marker and level. I decided on making the holes 4 inches apart and at least 2 inches from each edge and ensured the top holes were started at the same point on each board (so that it would look right to the eye once mounted).
With two boards, it allows the dowel to go through both boards and will therefore hold more weight. I also wanted a way to know if the kids had pulled a dowel out without the entire shelf falling to the floor. So far, nothing has moved an inch so it seems the boards are very solid yet still appear streamlined!
The boards are quite heavy and so the back board is drilled into a stud in at least one place on each pegboard and the front board is drilled onto the back board with a small piece of wood between to allow a bit of space and provide extra strength. All boards are sitting on a 2x4 at the bottom behind the storage drawers to add an extra support.
If you have any questions at all, please add them to the comments and I will answer them there!

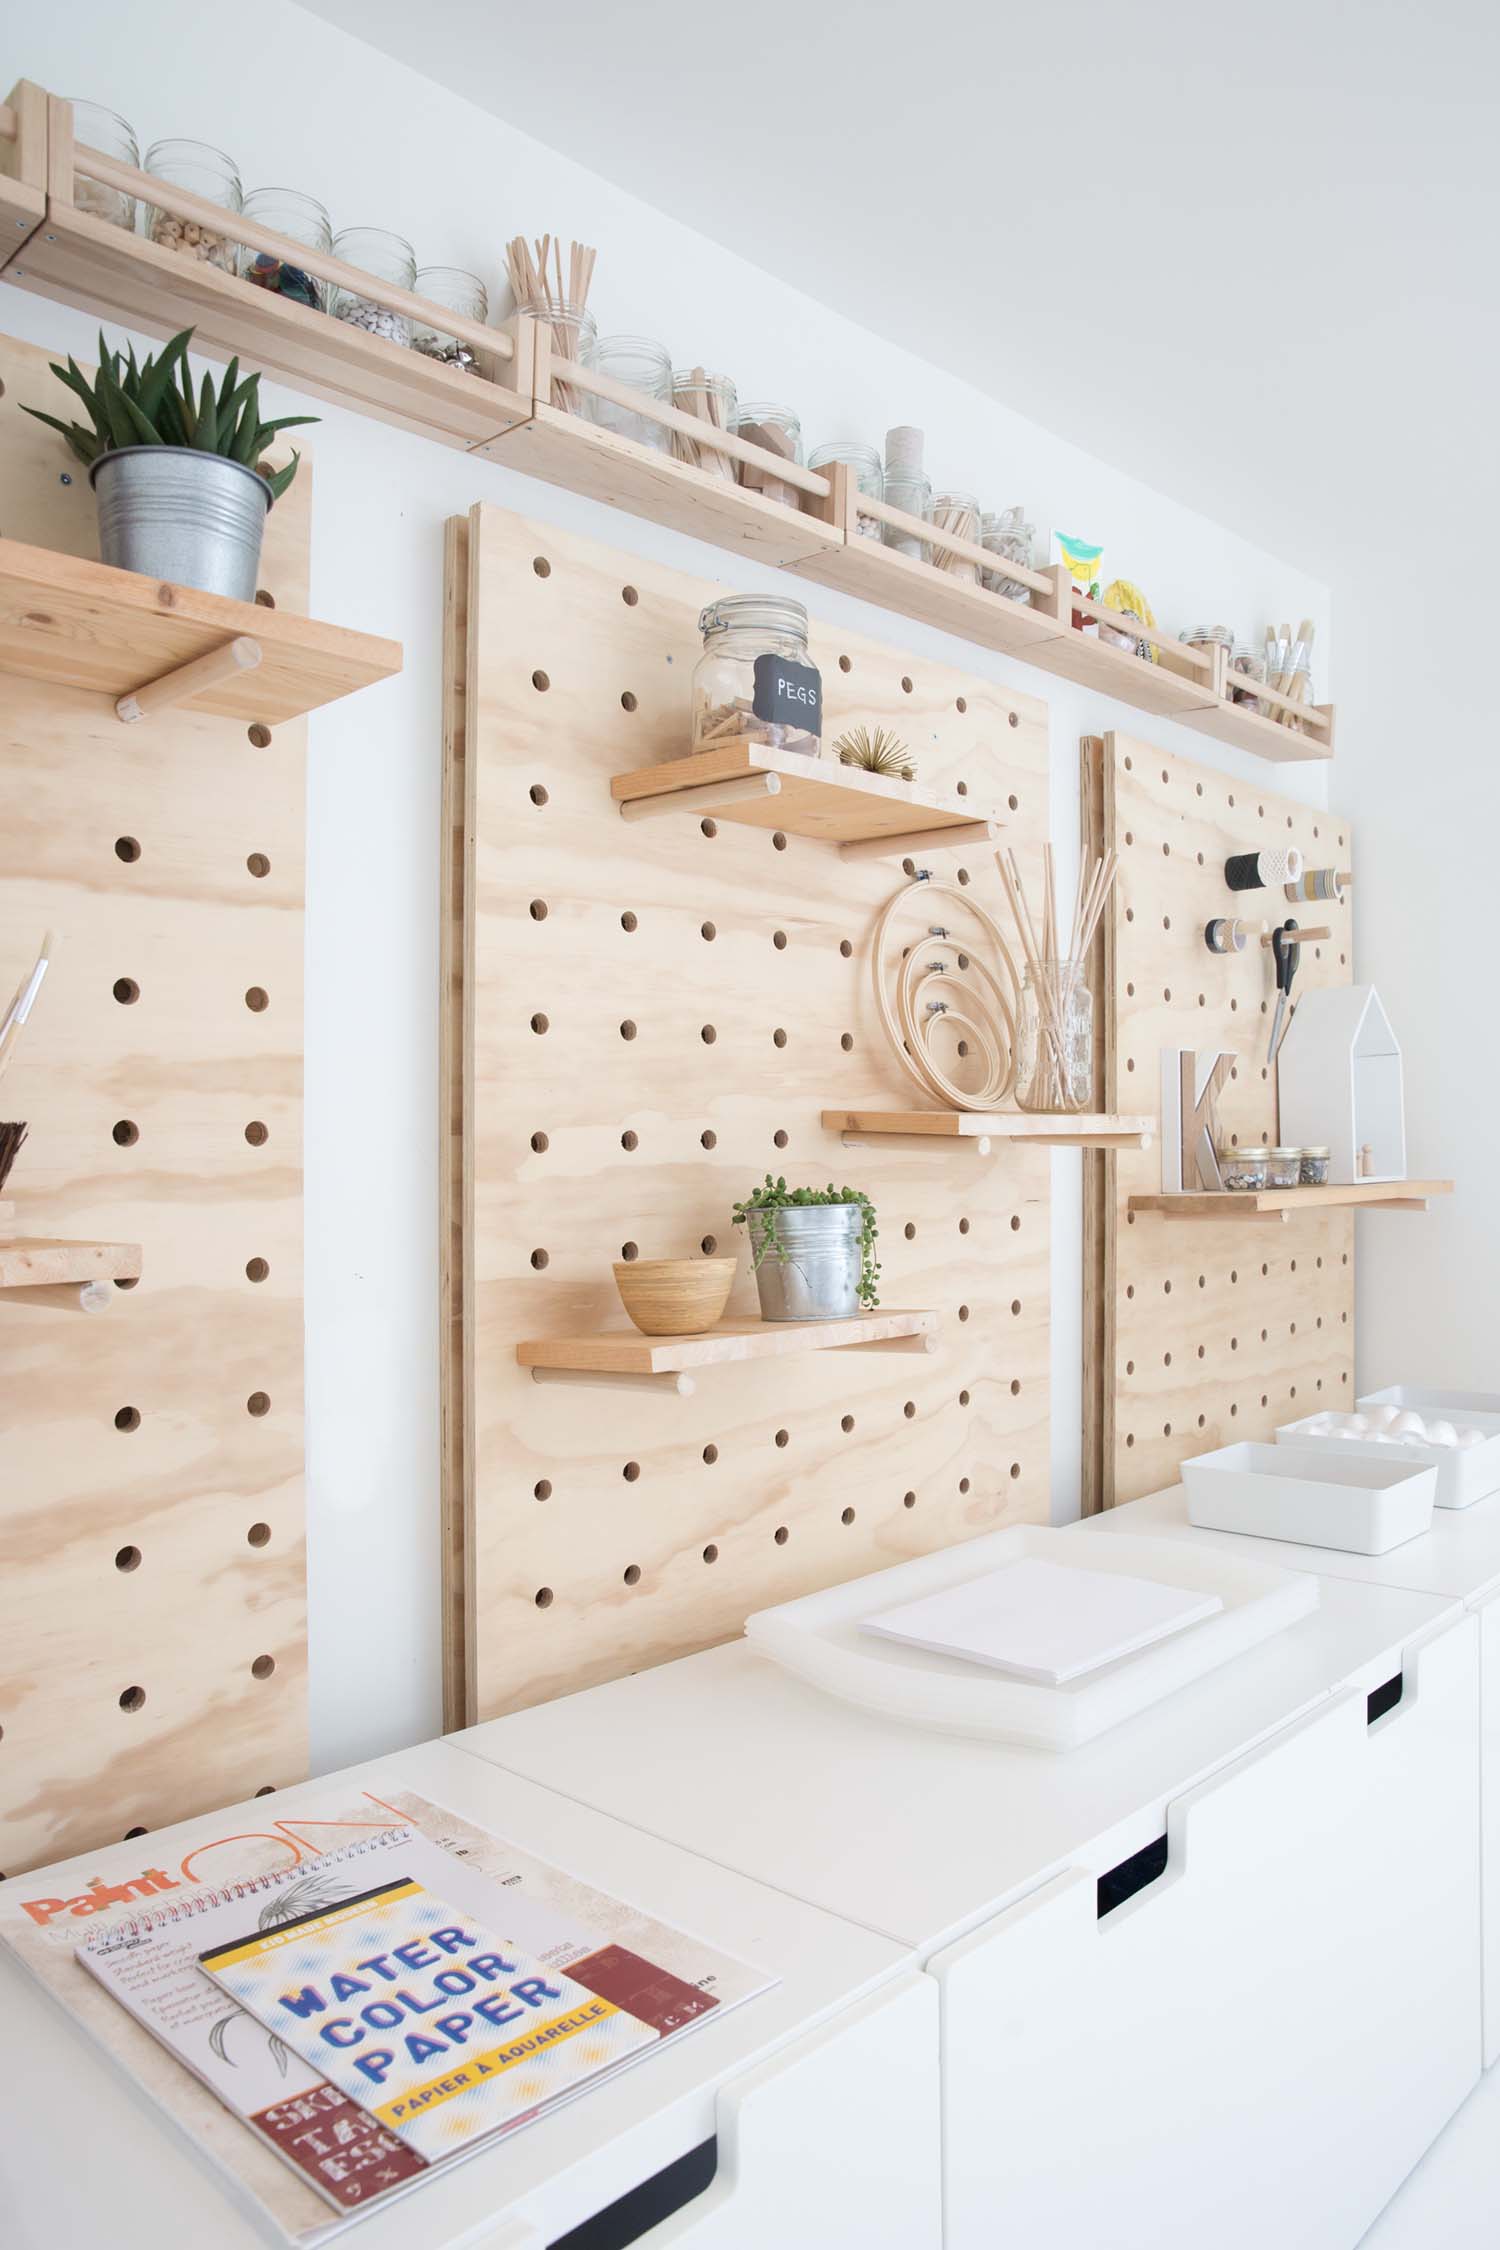
GET THE LOOK {KIDS ART STUDIO}

I am beyond thrilled that our kid's creative art space inspired some of you to think about creating nooks for creativity in your own homes! I find so much joy in knowing the work I do helps your little ones. I have been getting questions about where various things are from so thought I would share where to find the basics of this room!
A couple of weeks ago, I shared all of our favourite art books for kids as I felt it deserved a post of its own! I've also been asked to share how we made the pegboards; these were a project themselves but turned out so well. Holes were individually drilled into two sheets of plywood (with a piece of wood wedged in between) so that the dowels would be able to support a good amount of weight.
Many of the big pieces are IKEA as this room is a basement rough space, and we decided we wanted pieces that truly didn't matter if paint was splattered on!!! As this is a space for the kids to be free, the point is that it IS messy...and that's ok.

01. // Clear acrylic shelves; 02. // Multi-sized paintbrushes; 03. // White wipeable chair; 04. // Ceramic wall vase; 05. // Graphic laundry basket; 06. // White drawer storage; 07. // Cactus art print; 08. // Clay rolling pin; 09. // Wipeable art table.
If you have questions about any other item, please leave them in the comments and I can answer for everyone to read. More than happy to share.
May your weekend be full of creativity and a little messy playfulness :) Happy Friday everyone!
EASY WAYS TO ENCOURAGE ENERGY SAVING WITH KIDS

Teaching our kids about the environment is part of our every day lives. We limit packaging in the kitchen, recycle where we can, walk to local stores, compost our food scraps so it makes sense to teach them about saving energy too!
When BC Hydro contacted me to share about their newest challenge, Team Power Smart, where you can sign up to see if you can reduce your home’s electricity use by 10% (they’ll reward you with $50 off your bill!), I thought it would be a fun way to get the kids involved in thinking about saving energy in their daily lives.
Kids love to feel useful (and we are lucky ours love to help) so if you teach them how their actions can help our beautiful planet, it encourages a caring attitude and starts the conversation about how small changes they make can help shape their future.


Here are some easy ways to encourage your kids to save energy:
1. Use a nightlight instead of leaving the hallway light on:
Little ones can be scared of the dark and a nightlight is a great way to help them feel more comfortable going to sleep.
2. Use blackout curtains (helps babies sleep better too!):
It’s surprising how much warmer / cooler your home will seem with quality blackout curtains. You can start using these from Day 1 in a baby’s room and teach little ones that their curtains are helping to keep their room the right temperature so you don’t have to change the thermostat. A dark room is perfect for encouraging a good night sleep too!
3. Close the fridge door:
“Shut the fridge!” can be heard multiple times a day in our house. Anyone else’s kids open the fridge door and leave it open?!! It’s a simple step to help in keeping the energy in.
4. Turn the lights off when you leave the room
We are all guilty of this but it’s so simple to quickly flick the switch when you leave the room you are in and teach kids to do the same. Quick reminders seem to do the trick for us.
5. If they use electronic devices, teach them to turn them off when they are finished
Whether it’s the TV, an ipad, laptop or other device, teaching kids to turn off what they aren’t using helps to save the need to power up so often.
Interested in learning more about the BC Hydro Power Smart Challenge? Sign up here!
*This post was sponsored by BC Hydro, all words and opinions are my own. Thank you for supporting our partners!
5 WAYS TO TACKLE KIDS ROOM STORAGE

image from rafa + leo's room
Do you find it hard to keep your kids toys tidy? Are they sprawled all over the floor and do you feel overwhelmed by the mess? Storage is SO important in the way our homes function and I thought it might be helpful to walk you through some key ways to keep the crazy stuff kids need (and often don’t need) under control in a way that is both functional and pretty too.
Back in the day (aka pre-kids), I used to have a tidy house. I remember feeling organized with a tidy kitchen, papers organized, clothes hung up and everything else hidden neatly away. I remember managing with a basket of toys and an orderly house with 6-month-old twins...AND THEN THEY BECAME TODDLERS!!! Even if you are of the more minimalist nature, with kids comes STUFF! If you were organized in the baby stage, wait until you have toddlers! With toddlers comes clothes, toys, books, gear, artwork, more clothes, more toys, more books and more and more stuff. One of the first questions my clients ask is, “how are we going to store all of the stuff that we have accumulated with the kids?" I tell them that there is a way. That we will find a way. So much so, that we will test my five minute rule when the room is done (keep reading).
In my own home and in the rooms I design, I like to use the five-minute rule: Can the room be cleaned up in five minutes or less? If yes, then storage is doing its job well.
Here are my top 5 ways to store things in kids rooms.
1. Use shelves:

image from xavier's room
Wherever possible, use the vertical space you have on the walls. Think about whether there is space above a window, even under a window, or a wall where a shelf could fit. With so many options for shelving, you can choose simple slim shelves like the ones above for books and toys (from IKEA) or deeper shelves that can be used to store almost anything, like the ones below left. Making use of the vertical space a room has will mean fewer toys to trip over. You can style shelves so many ways too and change what’s stored on them with the changing needs of your little one. I particularly love the vertical shelf below as it has both open and closed storage space meaning that you can still keep a few things hidden while allowing little ones to see and pull out the toys that they want to play with.


images from leo + rafa's room
2. Use baskets, baskets, baskets!


By now you probably know that I add baskets of some sort to almost all of the rooms I design. They are so incredibly versatile to quickly store larger toys or stuffed animals and if you pop a lid on top, you won’t even see the mess! I love baskets so much that I have an entire board devoted to them over on Pinterest where you can find lots of suggestions for pretty and practical storage, baskets and bins.
3. Make the most of the closet

image via Olives and Belle

image via Monika Hibbs
This may seem obvious but there is so much you can store in a PROPERLY organized and space maximized closet. The key is to have space allocated for folded items, a few drawers, hanging space and space that you can store items you use infrequently up high (ideally all the way to the ceiling). Of course bars for hanging clothes at the right height (if your child dresses themselves) is necessary too. If you don't have a dresser, using baskets for socks, tights, etc works well right in the closet. The main benefit is that you can just close the doors!!! ;)
4. Double (or triple!) task your dresser
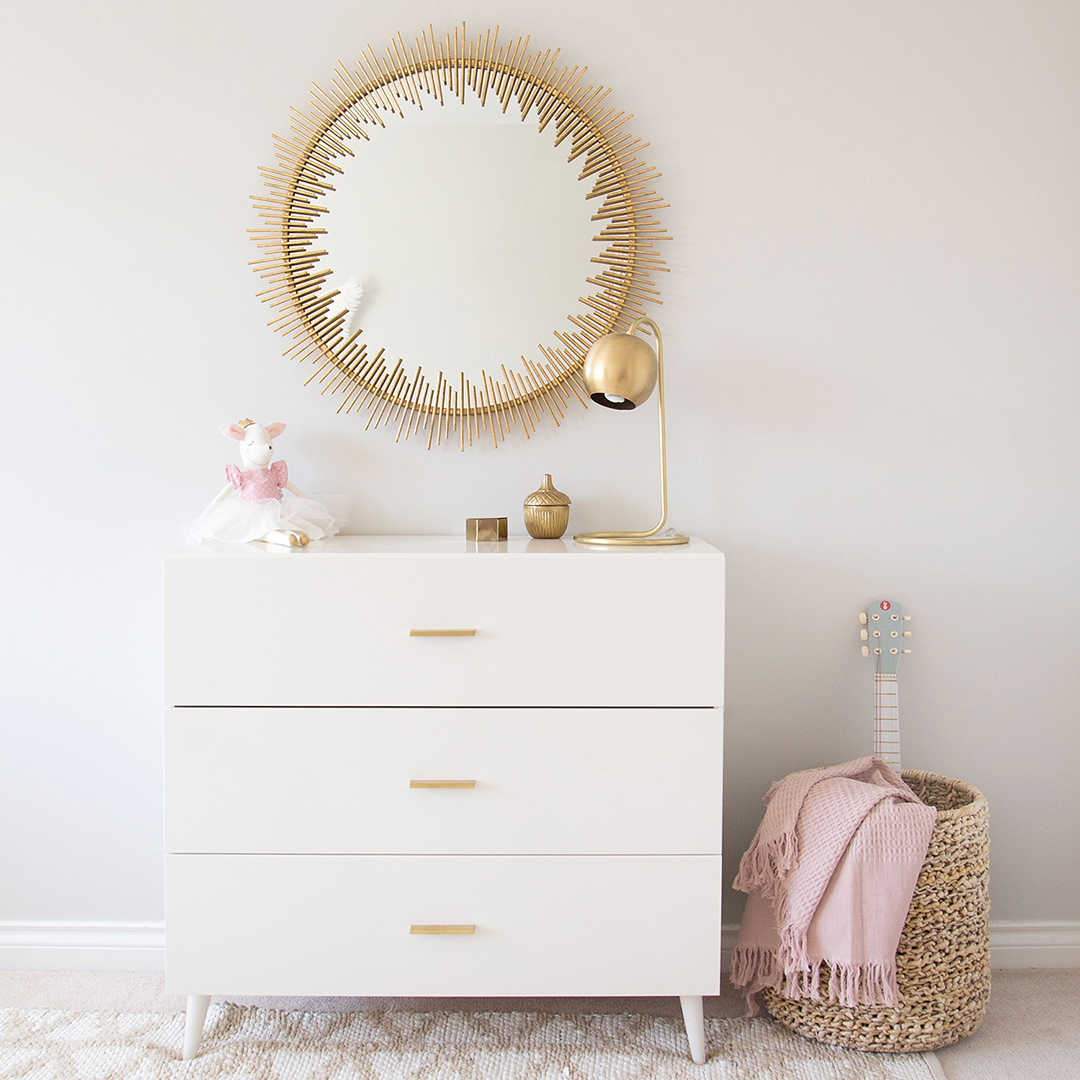
image from Ella's room
A dresser is a key piece of furniture for more than just clothes! If you are having a baby, I often recommend saving on a change table and buying a dresser that can last through the years. The top drawer is perfect for diapers, wipes, any lotions or wash clothes. The middle drawer can then have lots of folded clothes and I recommend using the bottom drawer for toys that a child can access themselves and which you can simply close the drawer on! It's a simple system that seems to work really well for lots of clients. The hanging items then go neatly in the closet and linens, etc can be stored in their too.
5. Add hooks


Hooks are an easy way to encourage children to clean up by themselves (hurray!) and for you to find a place for loose items with a strap. It is handy to have a few at child height for items such as sweaters, morning robes, bags, dress up clothes, toy cameras, backpacks, etc. Any toy with a strap can be hung on them too.
A well organized room should be able to be tidied away in 5 minutes of less. Quickly pop books back on the shelves, bigger toys go in the covered bins, clothes in the dresser and closet, blocks and smaller toys in open baskets on shelves with little accessories hung up. This is a great system for little ones to start when they are young and learn and grow into with guidance.
I'd love to hear of any other ways that you manage storage in your kids room. Tell me in the comments below.

HELLO!
WINTER DAISY was created when Melissa Barling was laying on the couch while pregnant with twins. She dreamed of a beautiful baby room but couldn't get up and make it happen. The babies were born and in those mid night wakes and early morning feeds, she decided to leave her corporate job to start a design studio + blog. Welcome to WINTER DAISY.
Follow along on Instagram
POPULAR POSTS...


CATEGORIES
- BOOKS WE LOVE
- BOYS ROOMS
- DESIGN TIPS
- DIGITAL
- DIYs
- EFFICIENT MAMA
- FAVOURITE FINDS
- FREE PRINTABLES
- GARDENING WITH KIDS
- GIRLS ROOMS
- GIVEAWAYS
- HELLO
- HOLIDAY
- HOMESCHOOL SPACES
- HOW TO...
- I'M MELISSA
- INSPIRATION
- KID STYLE
- KIDS ROOMS
- MINI GATHERINGS
- MY FAMILY
- NURSERIES
- OH MONDAY!
- ORGANIZATION
- PICKS
- PLAYROOMS
- RECIPES
- RENTAL HOUSE
- RENTAL HOUSE #1
- RENTAL HOUSE #2
- RENTAL HOUSE #3
- REVIEWS
- ROUNDUPS
- SHARED ROOMS
- SHOPPING
- SHOPS WE LOVE
- STYLING
- TODDLER ROOMS
- TRENDS
- gift guide
SUBSCRIBE
Disclosure
WINTER DAISY BLOG contains affiliate links as well as advertising banners. I may receive a small commission on purchases made through links from this site. The content is always reflective of items, things and experiences that I genuinely like and I only work with companies whose aesthetic is in line with the WINTER DAISY brand.
Sponsored posts will always be clearly disclosed.